• Skip to main content
  • Skip to footer

William L. Stuart

author of The Gemstone Chronicles Series

  • Home
  • Blog
  • About
  • Contact

Gemstone Posts

Tumbled Emeralds – The Final Chapter!!

December 15, 2012 by Bill Stuart 2 Comments

Tumbled Emeralds – The Final Chapter!! I finally finished tumbling the emeralds that I started over a month ago. Sometimes the tumbling process takes a while and the harder the stone, the longer it can take. In retrospect, I probably should have tumbled them longer with the coarse grit before moving on, but, live and learn. I will do it next time I start a bunch from scratch! So, here is the final chapter of tumbled emeralds!

Anyway, to refresh (unless, of course, you want to go back and read all the previous tumbling posts), I placed a number of rough emeralds in my tumbler and began the process with coarse grit silicon carbide. See the Tumbled Emeralds post for details!

Emerald rough

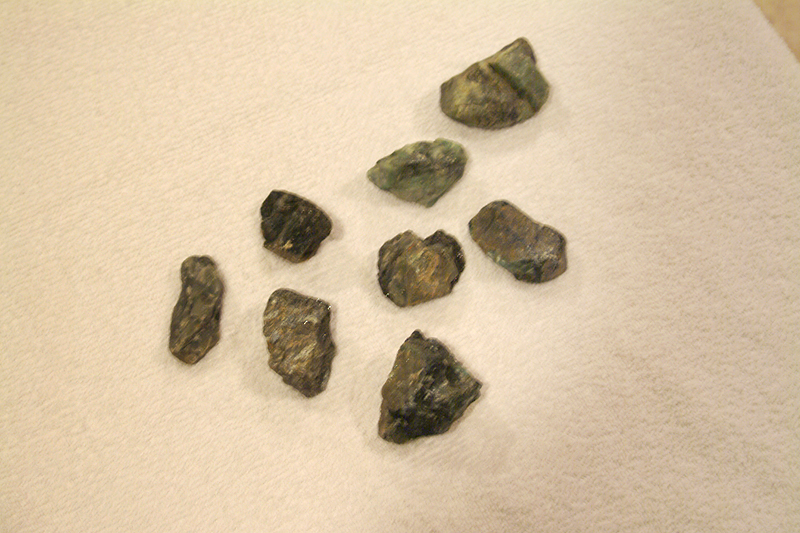
After a week or so, I took the stones from the tumbler, cleaned them, and this is what they looked like.

Tumbled Emeralds - The Final Chapter Emeralds after 1 week of tumbling with coarse grit silicon carbide
Emeralds after 1 week of tumbling with coarse grit silicon carbide

Back in the tumbler they went, but this time with a medium/fine grit silicon carbide. Another week of grinding and polishing before we see the next results!

Tumbled Emeralds - The Final Chapter Emeralds tumbled using the med/fine silicon carbide grit
Emeralds tumbled using the med/fine silicon carbide grit

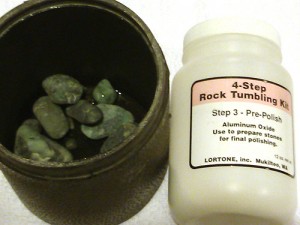
Once again, the emeralds go back into the tumbler. I add the pre-polishing compound for this step. This compound is aluminum oxide. After a week of constant tumbling, this is what I have. Note how the shine is really beginning to show now.

Tumbled Emeralds - The Final Chapter Pre-Polished Emeralds

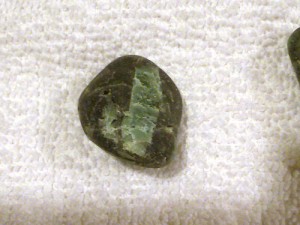
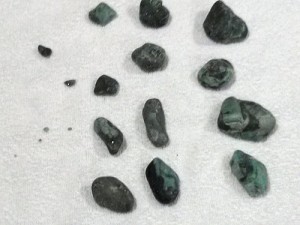
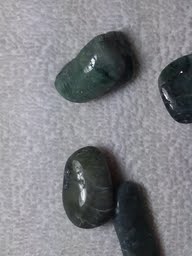
Finally, we arrive at the polishing step! It has been a long grind (yes, bad pun intended). The results are worth waiting for, though, as you can see from the pictures below. One of the cool things that tumbling does is create different shapes like those below. One of the emeralds ended up in a wedge shape and another in a sort of oval shape. I just love the way they turned out! What will I do with them? I don’t know. Maybe figure out a way to put them in a bracelet or a pendant, but I may just put them away and enjoy them just as they are!

Emeralds are one of my favorite gemstones and the Emerald is one of the gemstones stolen from the Elven Bow in The Gemstone Chronicles Book Three: The Emerald. What is your favorite gemstone? Do you prefer cabochons or faceted gems? Leave me a comment and let me know!

6 Tumbled Emeralds

All tumbled emeralds

Wedge Shaped Emerald

Tumbled Emeralds - The Final Chapter Oval Emerald

I will continue to look for stones to tumble (and I asked for another tumbler for Christmas) and I hope to buy a cabochon machine soon. Maybe if I can sell enough books, I will buy myself a faceting machine! That could lead to a whole bunch of interesting posts!!!

Don’t want to miss a post? Please subscribe to the blog! If you want to connect with me on social media, I can be found of Twitter, Facebook, Goodreads, or email me at bill@williamlstuart.com. I look forward to connecting!

Filed Under: Gemstone Posts

Gold ‘n Gem Grubbin in the North Georgia Mountains!!

November 18, 2012 by Bill Stuart 3 Comments

Gold ‘n Gem Grubbin in the North Georgia Mountains! 

For any of you who have been following my posts, you know that I love to go gem hunting in the north Georgia mountains. It was during one of my trips that my grandson suggested that I write a book incorporating the “magical” properties of gemstones with a quest and some elves and The Gemstone Chronicles were born!

My favorite place to hunt gemstones is Gold ‘n Gem Grubbin in Cleveland, GA. You can visit their website at: https://www.goldngemgrubbin.com.

Gold n Gem Grubbin Entrance

Here you can pan for gold, work buckets at the sluice, or dig at the creek. I prefer the creek. There is something about sitting in a chair, sifting through pans of dirt in the creek, and looking for shiny rocks that relaxes me. We were doing this when Aidan suggested the book. Below is a picture of the sluice area where you can buy buckets of rocks and sift through them to find treasures!

Gold n Gem Grubbin Sluice Area

Mining at the Creek!

As I said, I prefer mining at the creek. I didn’t take any pictures of the dirt pile that I worked. Gold ‘n Gem Grubbin is part of an operating gold mine. The owners will dump loads of dirt from the gold mine next to the creek and you can fill up buckets with dirt and screen them right there in the creek and take home what you find. While you aren’t guaranteed to find anything, I have been going almost monthly for a few years now and I have never come home empty-handed. November 16 was no exception!

Gold n Gem Grubbin Haul
This is my haul from about 4 hours of work! There are various quartz, some amethysts, garnets, rubies, sapphires, aventurine, emeralds, hematite, and a few others.

Below are some closer shots of some of the stones! I apologize for the quality of the photos in advance…

Gold n Gem Grubbin Amethysts
Various amethysts that I found Nov. 16 2012. They vary in color from a light purple to a much darker purple!
Gold n' Gems Grubbin' various stones
Rubies, Sapphires, and Hematite
Gold 'n Gem Grubbin Quartz
Quartz

What will I do with my stones?

Now, I am not a skilled maker of cabochons or faceted gemstones (though I would really like to learn). I know some people who are and I may tumble some of the stones, have them made into cabs, or have them faceted. I don’t know yet, but my collection continues to grow. Assuming the weather is nice, I may be back there in December with shovel and sifting box in hand!

If you are ever in the Cleveland, GA area and need a neat activity for you to enjoy, give Gold ‘n Gem Grubbin a try!

Have you visited Gold ‘n Gem Grubbin? If so, leave me a comment and let me know how your day went. If you prefer to connect with me on social media, I can be found on Twitter, Facebook, Goodreads, or email me at bill@williamlstuart.com. You can also subscribe to the blog and never miss a post!

P.S. This is not an endorsement and I did not receive any compensation for this post. I like going up there and thought I would share!!

Filed Under: Gemstone Posts

Tumbled Emeralds – Part 3! Smoothing Out the Rough Edges…

November 2, 2012 by Bill Stuart Leave a Comment

Tumbled Emeralds – Part 3!

I have an update on the emerald tumbling I have been doing.  I have now finished the second step of the tumbling process and proceeded to Part 3. Below are pictures of the emeralds after the med/fine grit did its job for a week during the second step. You can see how the little chips are knocked off the larger pieces and the rough edges are smoothing out. The silicon carbide grit is doing its job!

Tumbled Emeralds - Part 3
Emeralds tumbled using the med/fine silicon carbide grit
Tumbled Emeralds - Part 3
Large emerald after step two of the tumbling process.

Note that the stone is smoother and more rounded than in the previous step. However, there isn’t much shine yet. That will begin to show up after step 3, the pre-polishing step. As the grit gets finer, the polish takes shape.

Tumbled Emeralds - Part 3 emeralds in a tumbling drum with pre-polishing compound
Emeralds loaded into the tumbling drum with aluminum oxide pre-polishing compound.

The next post will be in a few days once the pre-polishing step is complete. In the meantime, I think some more gemstone hunting and writing The Gemstone Chronicles is in order!

What are your hobbies? Are you a creative with lots of crafty ideas, a golfer, a rock hound, or maybe a gold prospector? Leave me a comment and let me know!!

Connect with me:

Connect with me on Facebook, Twitter, and Goodreads! I look forward to connecting with you! Let’s start a discussion about books, gemstones, or other cool topics!

Filed Under: Gemstone Posts

Tumbled Emeralds Part 2 – Smoothing the Rough Edges!!

October 20, 2012 by Bill Stuart Leave a Comment

Tumbled Emeralds Part 2 – Smoothing the Rough Edges!!

Well, it has been about a week since I put the emeralds into the tumbler. I stopped tumbling them today in the first step of the tumbling process (using the silicon carbide coarse grit), rinsed them off, let them dry, and readied them for step 2.

Tumbled Emeralds after 1 week of tumbling with coarse grit silicon carbide Part 2
Emeralds after 1 week of tumbling with coarse grit silicon carbide

You won’t notice a huge difference in the stones yet, except for the fact that some of the hard edges and ridges have been smoothed away and some smaller pieces have broken off.

Tumbled Emeralds with smooth edges from tumbling Part 2
Emerald with smooth edges from tumbling

Now it is time for step 2 of the tumbling process. I reloaded the tumbling drum with the emeralds, added the med/fine silicon carbide grit, and filled the drum with water. I put it back on the tumbler for another week! The plan is to smooth the rough edges.

Tumbled Emeralds loaded into tumbling drum with med/fine grit Part 2
Tumbling drum loaded with emeralds and the med/fine silicon carbide grit

I did get some work done on The Gemstone Chronicles fantasy adventure series, so I didn’t waste the entire week! Stay tuned for more updates on the books and the emeralds!

Do you tumble any rocks, metal, or glass? Do you make jewelry with them or just admire their polished beauty? Leave me a comment and let me know!! You can also connect with me on social media on Twitter, Facebook, Goodreads, or email me at bill@williamlstuart.com. If you don’t want to miss a post, subscribe to the blog! As always, it’s fun to meet and connect with new friends!

Filed Under: Gemstone Posts

Tumbled Emeralds

October 14, 2012 by Bill Stuart 21 Comments

Tumbled Emeralds!

I have received a few questions regarding tumbling emeralds in the rock tumbler. Since I have an abundance of rough emeralds (most of which are not facet quality), I decided to do a few posts on the process of tumbling them. Let’s get started with our tumbled emeralds!

The Process:

The first step in the process is to tumble the rough stones using a coarse grit compound. Luckily for me, I have a kit that includes 4 different grits of compound. For the emeralds, I use silicon carbide and water. The stones will tumble for about a week before I will take them out, rinse them, and change the polishing compound to a finer grit.

Below is the picture of the emerald rough before I started the first step. I found some of these in Hiddenite, NC and some in Cleveland, GA.

Emerald Rough
Emerald rough from Hiddenite NC and Cleveland GA

Once I have the rough selected, I load it into the tumbling drum and add the coarse grit silicon carbide.

Rubber tumbling drum and coarse grit

I don’t measure the silicon carbide. I simply sprinkle some into the drum until I think I have enough. Yes, there are measurements for it in the instructions for the kit, but if you aren’t filling the drum completely with rock, the measurements vary, so I just eyeball it.

Put the top on the drum and it is ready to go!

Tumbler Drum ready to roll

I put the drum on the tumbler and will check back in about a week. I will post photos of the rough stones when they come out of the tumbler and before I add the next step of the polish.

Tumbled Emeralds Tumbler

While I wait for the tumbles emeralds, I will be working on The Gemstone Chronicles!

Connect with me on social media! I can be found on Twitter, Facebook, and Goodreads! I welcome new friends to join in the conversation.

Filed Under: Gemstone Posts

The Great Emerald Hunt results…

October 7, 2012 by Bill Stuart 1 Comment

As I told you last week, Uncle John and I went to Hiddenite NC for the Great Emerald Hunt and to dig at the mine and try to find some emeralds. We made the four-hour drive from our Atlanta area homes on Friday afternoon. We dodged some traffic on the interstate by using the back roads,  and we finally got there.

Emerald Hollow Mine:

Saturday morning we got up bright and early and drove to the mine. We were the first customers of the day at Emerald Hollow Mine. We told them we wanted to dig. They issued our dig permit and gave us our complimentary bucket of dirt ticket (pictures coming later in the post). We also found out that the digging area was about a 400 yard walk from the parking area. Doesn’t sound like a long distance, but when you are carrying shovels, screens, and buckets, it can be a bit of a challenge. I decided to leave Lana’s nice camera in the truck and take pictures with my phone (sorry in advance for the poor photos and the limited number).

We headed into the dig area without a clue on what to look for or how to proceed. That didn’t stop us, though. We discovered the mine was a large tree covered hillside pock-marked from many other dig sites. We scouted around for a bit, then settled in to figure out what we were supposed to do. In retrospect, we should have done more research on how to do what we were doing. Maybe the hosts at the mine should have an introductory seminar on how to dig, but neither of those things occurred. John and I picked out a spot and started the hunt. One of the mine employees stopped by and told us to look for seams of mica and quartz and follow the seam until we (hopefully) hit a vein or some type of gemstone. Alas, in about 6 hours of digging, we found nothing….

What we brought home:

We didn’t want to leave empty-handed, of course, so we trekked back to the flumes and claimed our complimentary buckets of dirt. I found a few nice stones in the bucket, so I forked over $25 more and got an “emerald” bucket. It was a good bucket and yielded a number of emeralds and a few other stones. I found some orange calcite, emeralds, blue aventurine, blue sodalite, and a couple of pieces of quartz. Not bad for $25, but I would rather have found some hiddenite or emeralds as we dug. I don’t think I will be heading back to Hiddenite to dig any time soon, but John and I are considering a trip to Hogg Mountain (near LaGrange GA) soon to dig there. Stay tuned for pictures and a post about that trip (should it happen)!! Below are the few pictures that I took.

Emerald Hunt Hiddenite Mine Entrance

Emerald Hunt Screening at the sluice

More sluicing finds from the Great Emerald Hunt

And just in case any of you were wondering about hiddenite,  below is a picture of a hiddenite faceted stone.

Great Emerald Hunt Hiddenite gemstone

There you have it! The Great Emerald Hunt results are in. We didn’t strike it rich at Hiddenite, but we did find where the stones weren’t! Have you been to Hiddenite? If so, what did you find? Leave me a comment and let me know, or, even better, share a picture of your finds with me.

Connect with me:

You can also connect with me on Twitter, Facebook, or drop me an email at bill@williamlstuart.com!

Filed Under: Gemstone Posts

  • « Go to Previous Page
  • Page 1
  • Interim pages omitted …
  • Page 4
  • Page 5
  • Page 6
  • Page 7
  • Go to Next Page »

Footer

Follow Me on Social Media

  • Email
  • Facebook
  • Pinterest
  • Twitter

Follow Me on Goodreads!

Follow Me on Goodreads

Search this website

Site Policies

  • Privacy Policy
  • Terms of Use
  • Cookies Policy
  • Accessibility Statement

Copyright © 2026 Food and Fiction, LLC. All rights reserved.